BCMS reporting for masses, part 1: Real Time Statistics
For many call centers out there, BCMS statistics are more than enough and there is no real need for CMS. However, BCMS per se does not store historical data for more than a week–and that’s only for summarized day data, interval data is stored only for 48 intervals, that’s only a day with half-hour interval. There is BCMR Desktop software available from Avaya but it’s old, outdated, cranky and grossly overpriced in my opinion. There are alternative reporting systems like NetLert N-Focus or TASKE but they’re also relatively costly and not always justified for a small call center. So, BCMS that comes as standard with CM3/CC3 and higher becomes a valuable tool that is already there and can be very helpful if used properly.
The main BCMS disadvantage is that its data can be accessed only via text terminal on the PBX, not too user friendly and requiring that supervisors and/or managers should be given access to PBX that is, even if in read only mode, mostly too problematic for support personnel–people who manage people often are not too techy-savvy and tend to have trouble even with the most trivial tasks, not mentioning that mostly they’re afraid of anything not fancy-pretty-graphical and won’t touch a text terminal with a stick if they have any choice. This lack of affection for anything technical may be overridden with administrative pressure from above but, as always, will result in undercover resentment and resistance, creating a potential conflict point within company–but what is more important, it lessens effectiveness greatly not only because people are ineffective per se, but also because they refuse to bend to what they think those “tech freaks” are trying to force them do and won’t try to do their best even if just out of pure denial. Thus, some acceptable solution is needed for both technical and managerial personnel, giving the former an easy to support tool and the latter, an easy to use tool.
In my practice, I used variety of ways to achieve this, but eventually it boiled down to two parts: real time statistics via pre-programmed terminal and historical statistics via http. In this post, I will describe the first part.
In short, there’s nothing complicated about this part and that’s its main advantage. What we need is PBX with correct options available, a restricted login with access to BCMS reports and terminal emulator that supports chat scripts and 513 or 4410 terminal. It is possible to use vt100 or W2K terminal types in PBX but that’s not too convenient for users.
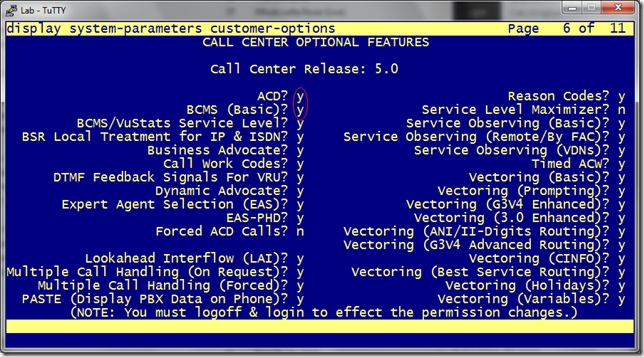
First, we need our PBX to have ACD and BCMS functions enabled, like this:
It may not be clear from smaller thumbnail picture but when clicked it’ll open a larger picture, in which you can see that first two options, ACD? and BCMS (Basic)? are both turned on (y) and encircled with red. These two we need for BCMS to work.
Second task is to create a restricted login that has read only access to PBX. I won’t describe this process here because it is well documented already. Suffice it to say that for the purpose of this article, I assume a login named “reports” is created with password “reports1”.
Third step is to set up our terminal emulator to display the reports we need without our intervention. For this task, I will describe how to use my terminal emulator TuTTY, which is essentially an extension to famous PuTTY. You can download TuTTY from its download page, I recommend using stable version for production environment, although the development version is also quite stable. It has been a development version for much too long, I admit… Well, TuTTY has an advantage of being developed as drop-in replacement to Avaya Site Administration software (however never had quite achieved that), but it also has some disadvantages, most notable one is that it stores its settings in Windows Registry. That means we’ll need to set TuTTY up on some computer–probably the same used for PBX administration–and then copy Registry settings to managers’ and supervisors’ computers. That’s not as bad as it sounds, however I would prefer to finish a long-being-developed version that can store its settings in disk files, allowing to place both TuTTY and its preset configuration file on a read only network share available to designated users. If only I could find time for that… So unfortunately, at this time it is necessary to copy Registry on users’ machines. As I said it’s not as bad as it sounds and probably shouldn’t be a maintenance burden for five or ten supervisors or managers. More than that and you’d probably want to use CMS anyway.
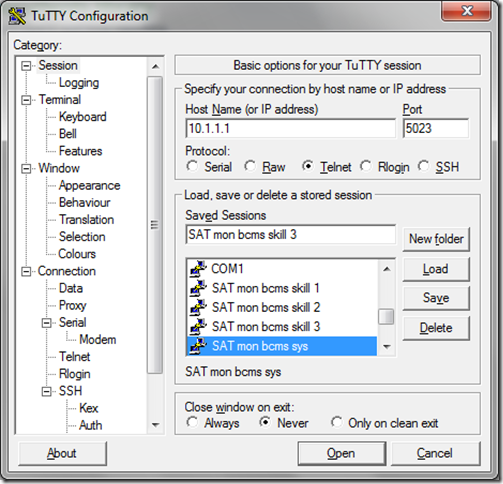
When you have downloaded TuTTY–it does not require installation, just put it in a folder somewhere on disk, i.e. C:\Progam Files\TuTTY–you need to set up connection sessions to your PBX. I say “sessions” because you will probably want your users to have access to different BCMS reports and it’s a lot easier to create multiple connections and shortcuts rather than teach users how to type in terminal commands. You start by launching TuTTY from its folder–there is no need to create desktop shortcut at this time–and filling in some basic parameters, like protocol and host name and port:
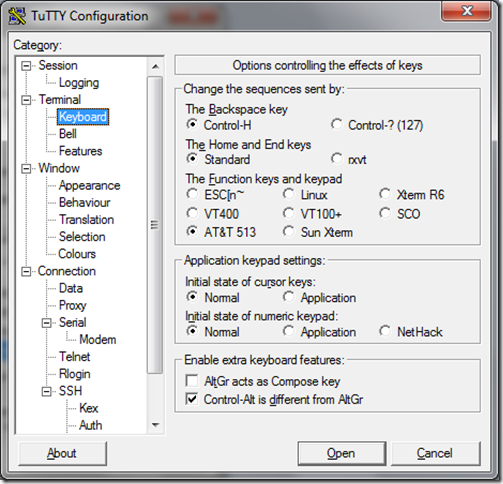
Here I have created several stored sessions for illustrative purposes, but upon first start you will see empty fields except “Saved Sessions” list, where one “Default Settings” line should be present. You can change it to have TuTTY always start with preset options but that’s not necessary since we want it start with different options for every shortcut and so we’ll need different shortcuts anyway. So, fill in Host Name, Port and Protocol fields as shown. It works best with Telnet protocol, SSH can be used too but its setup is too complicated for this article. Type a session name in “Saved Sessions” input field–the one that shows “SAT mon bcms skill 3” here–but do not press “Save” button yet. Continue to Terminal-Keyboard category screen by choosing it in the leftmost list.
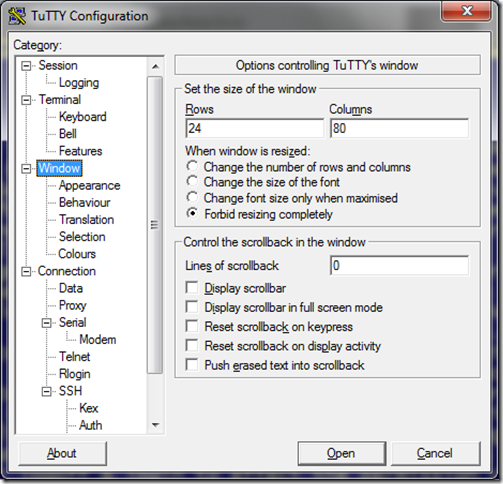
Set “The Function keys and keypad” field to “AT&T 513”, click “Yes” and continue to “Window” category screen.
You can change any option as you like, of course, but for the best appearance and ease of use I would recommend you to set all options on this screen as they’re set on the screenshot shown. After doing that, continue to Window-Behaviour screen.
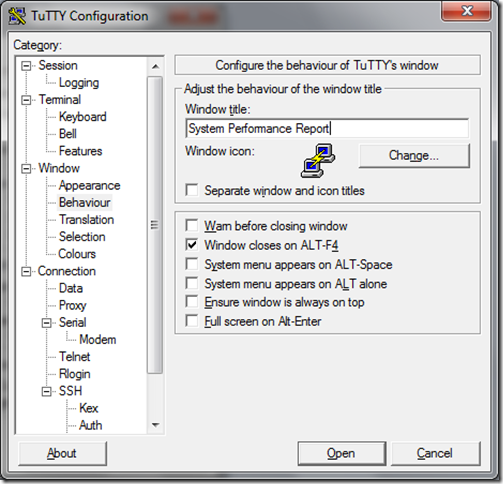
Again, I would recommend to set all options as shown on this screen, except Window icon and Window title. You can change default TuTTY icon for something more attractive–however that’s not required–and I’d strongly recommend to set some meaningful Window title that would allow to distinguish between several open TuTTY windows easily. In this example, I’m setting terminal for overall performance report with “monitor bcms system” command, hence this window title. Having done that, continue to “Connection” category screen.
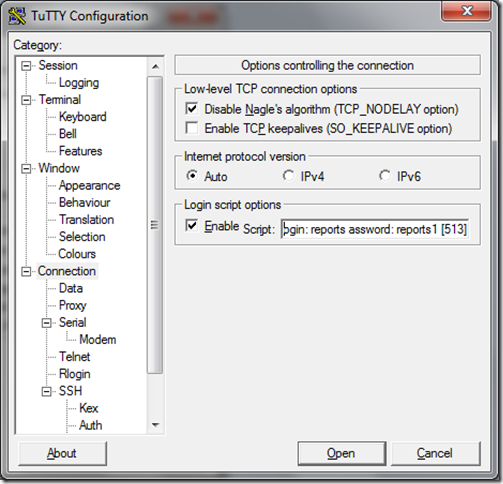
Here we need to do two things: turn on login script by ticking “Enable” checkbox and type in the script itself. It’s simple chat script, nothing fancy, just expect-response pairs one after another. We use it not only to login into PBX but also for typing in PBX command that we need. In this example screen it’s not shown but the full script goes like this:
ogin: reports assword: reports1 [513] 513 Command "mon bcms sys"
Note that the command is enclosed in double quotes and thus treated as single word. You can use any monitor command here, just don’t forget to put it in double quotes. And of course you need to change that “reports” login and “reports1” password to actual login and password you created in PBX.
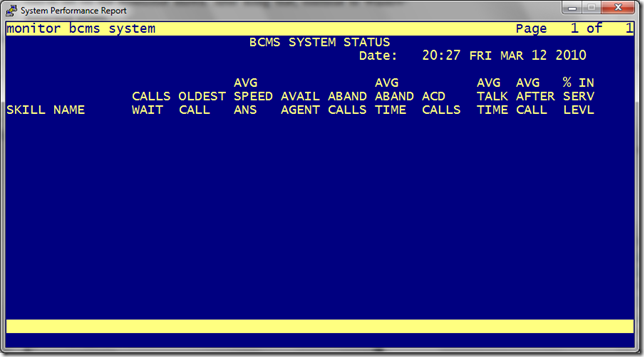
Well, that’s almost all with TuTTY configuration. Return to topmost category screen named “Session” that you saw first, make sure there is a meaningful name typed in “Saved Sessions” input field and press “Save” button. That’s it. You need to test it now by pressing “Open” button or double clicking session you’ve just saved in the list. If everything is done correctly, TuTTY terminal window should appear instead of configuration dialog box, connection should be established and chat script should result in monitor command run on PBX, displaying some statistics or probably an empty screen just like this:
It will be empty if you have no ACD hunt groups defined or didn’t turn on BCMS data collection by setting “Measured” field to “internal” or “both” on the second page of hunt group’s configuration screen.
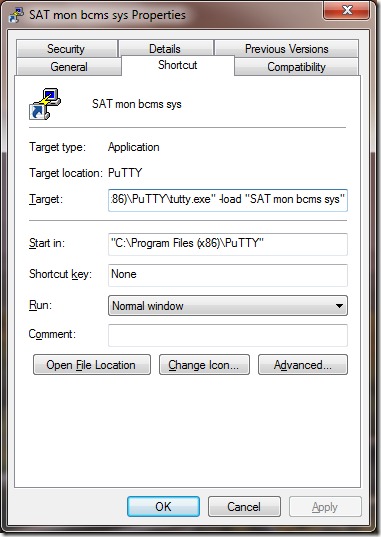
The final step is to create shortcut to the session we created, so that user could “open report” without unnecessary hassle. Create a desktop shortcut as usual, then open its properties and add command line parameter to Target field, like this:
I will spell it out here:
-load "SAT mon bcms sys"
Obviously, it instructs TuTTY to load saved session named “SAT mon bcms sys” upon starting. You should use your session name instead, of course. After modifying shortcut, OK it and try double clicking on it. TuTTY should open up and display monitor command output, refreshing it every 30 seconds. If there is more than one page you can use F7 and F8 keys to move to next/previous page, just like in ASA. :) Unfortunately, F1 key will also work but you can instruct users to close and reopen window in case their reports “misbehave”. Alternatively, you can use some other terminal emulator that doesn’t support 513 natively but allows defining custom keys–like TeraTerm or something alike, unfortunately neither PuTTY nor TuTTY support this–and define only F7 and F8 to give users no chance of messing up. That would make it almost bullet-proof solution, but unnecessary in my opinion.
Now, after you have created all sessions and shortcuts to them you will need–with every split covered–you need to copy all these settings to users’ computers. To do this, you can follow PuTTY documentation found here: Storing configuration in a file.
So, that’s about it. You can even use it as “poor man’s wallboard”, placing big TV connected to computer on a wall and displaying several BCMS reports on it this way. In such case I’d recommend to change default nuclear yellow-on-blue color scheme to something more eye-friendly and traditional, like black-on-white. Or green-on-black if you like to prolong that TV’s life. TuTTY allows defining every color in a scheme (foreground, background, etc) as RGB trio, thus making chemical-looking terminal colors unnecessary.
dwalin,
Thanks for sharing both of the BCMS articles, very useful for those customer who dont have BCMR-D
When I set the above configuration,with our login and password. System is makin a connection but i get the “login as:” prompt.
isle,
Are you sure you’re using Telnet instead of SSH? With SSH, authentication is done before terminal is activated and thus login script has no chance to work. If you absolutely need to use SSH, you’d need to create a key and use private key authentication instead of password-based.
Regards,
dwalin.
Thanks, I change to telnet and now it work.
Hi,
I wonder if it is possible to run those reports with disabling some of the/all function keys?
Solution is very nice but it is still a risk if user presses F1 and do some other commands….any idea how to prevent it??
Mike,
Not with TuTTY, unfortunately. It may be possible with other terminal emulators but I’m not 100% sure of this. I do plan to include such restrictions in TuTTY, it will probably be a next version or the one after next, but I can’t say at this time when it will be ready.
The solution I used was to run these reports under severely restricted login. This way, pressing F1 would not give user an opportunity to misuse anything but would rate as mere inconvenience.
Regards,
Alex.
Hello,
My tutty terminal window times out after 1 hour. I know with putty there is an option to set “Seconds between keepalives”, but I don’t see this in the tutty options.
I tried the “Enable TCP keepalives” option, but it still timed out. Do you know of another solution that will prevent the terminal from losing connection?
Thanks,
JW
JW,
Hmm, that’s really strange. Could you please clarify which TuTTY version are you using and with which CM version?
Regards,
Alex.
Tutty version is 0.60.2.0
CM version is 5.2
The timeout actually occurs after 2 hours. The terminal window stays open, but stops updating. I am seeing a “Command aborted” message above the prompt when no commands were issued.
Thanks for the quick response.
JW
“Command aborted” is not given by TuTTY, it’s a CM message. I’d recommend you to check on CM side.
Regards,
Alex.
did you ever find the answer as to why your “monitor bcms xxx reports” were timing out after 2 hours?
I am looking to find information on why the refresh for the “monitor bcms skill” stops working. We are running the command directly in ASA and the version is 6.3 with latest release of ASA as well.
You can do the same thing but using XML requests and responses?,
i.e. to receive BCMS report as XML.
If possible please tell me how.
Alex,
I see two possible ways to do this: either using AES with SMS service or rolling your own service that would request BCMS data off PBX via OSSI protocol and then expose it via XML or any other RPC method. The first way will probably be easier and faster to implement, although I have doubts as to its flexibility.
Regards,
Alex.
Hi Alex,
I saw this post only now, what I seek is actually view these screens via web, I know it’s possible, but do not know how to do, do you have any idea?
Dear dwalin
hi there
Thanks for sharing both of the BCMS articles, very useful to me.
i want to save “mon bcms skill into text file and after that export in DB and use for Dashboard application myself. is there any option available to do this through tutty? because this command doesn’t work with Avaya ASA. is this possible with any additional parameter with login script option? furthermore i want to set refresh rate after every 10 seconds instead of default 30 seconds.
Many thanks in advance.