Using CMS External Call History Interface, part 1: Data Extraction
Avaya Call Management System is very good as a standalone reporting solution, but it has its drawbacks, too. Besides having very outdated architecture and performance limitations, its lack of openness for external applications was always one of the major concerns for anybody who wanted to make the most of their call center. For example, people are often interested in cradle-to-grave call analysis or collecting “warm” sales leads or detailed agent statistics or detailed customer profiles or inter-switch call flow analysis; the list is very long–but the point is, there are actually only two ways of collecting that data. The one is by utilizing CTI applications and monitoring everything in the system, which is grossly ineffective, resource consuming and prone to incurable headaches; the other is by utilizing an obscure CMS subsystem called External Call History Interface. Unfortunately, Avaya have always positioned this mechanism as fit-to-purpose and there were very limited purposes, so many people don’t even know that their CMS can export loads of data they’re looking for! And even more of that, since November 7th 2005–almost five years ago, my, the time goes fast!–ECHI comes as standard, free of charge, with every CMS server sold by Avaya, so if you have CMS R13 or later you’re almost guaranteed to have this function enabled. The Big Question is: how to utilize it? This article is an answer to the first part of the equation: how to extract External Call History data and make it available for further processing by 3rd party applications–or just viewing in Microsoft Excel, plain and simple.
A little foreword: although ECHI can be utilized for various purposes and can benefit any call center of any size and complexity–there is always a need for warm sales leads collection, for example–I will assume typical setup for a midsize call center. In this case, CMS server exports ECHI data to an external database server running Microsoft SQL server, data is imported in the SQL Server with standard tools and is reported upon with standard reporting services. There are no specific requirements for Windows Server nor for SQL Server, although I would recommend using SQL Server 2005 or later, they have reporting services built in the software and it is quite adequate in my opinion. Of course, you can use old SQL Server 2000 and report with old Crystal Reports, it will be perfectly fine. Or use Oracle database with its reporting services, or even free database engines like PostgreSQL, it doesn’t really matter. What matters is that in this article, I will cover only data extraction, conversion and export. The second part of the answer to the Big Question, i.e. what to do with the data, how to process it and what kind of results to get from it, will be discussed in subsequent articles.
Well, enough talking! Let’s dive in!
First of all, you should check if your CMS system has ECHI licensed. To do this, first you need log in as root.
Now run “cmssvc” command and enter “1” at the prompt:

You should see RTU screen like this:
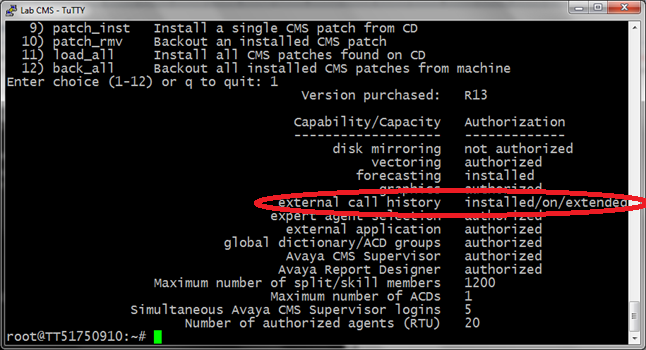
Take a look at “external call history” line, it should read “authorized”. In case it reads “not authorized”, it means just that and you don’t have this feature authorized on your CMS. Ask your vendor if ECH interface can still be purchased for your CMS system. Probably not by this time, but if you know the right phone number, just call it and they’ll make an exception for you. Things Avaya will do for money! J
If you see “installed/on/extended” like on screenshot, or something similar, then you already have ECH interface installed and turned on–which means that you need to research it more before doing anything. ECHI can be used to feed Avaya Operational Analyst, NICE Analyzer or some other application, so you better check with your vendor to see what’s that using it.
As a rule of thumb, any CMS system purchased or upgraded in last five years should have external call history authorized by default.
OK, so you have RTU available and want to proceed. Next step is setting up SSH environment, because my version of transmission script uses SCP utility to copy text files over the network to the database server. Why SCP instead of default UUCP? Well, UUCP is very outdated technology, there are none decent Windows implementations and even UNIX clones do not include UUCP by default these days. Besides that, UUCP does not support link encryption nor strong authentication, and when someone wants UUCP to be secure they tunnel it through SSH connection. Now that would be rather unnecessary complication, so we will just use SSH in the first place; it’s right there on your CMS server already, comes as standard package with Solaris OS so you won’t need to install it. Why not FTP? It’s not obvious but default FTP client in Solaris does not support atomic file operations–it means that upon invoking FTP to transfer a file, we cannot know for sure if the file was transferred in full, without errors. Besides that, FTP is as insecure as it can get, transmitting authenticating credentials in plain text along with the actual data. Remember, we’re talking about transmitting ECHI data dumps and they can contain pretty sensitive information–your customers’ ANI numbers, for example. I bet you wouldn’t want to have this information disclosed so we’ll use secure methods of file transmission.
I will not describe how to set up a SSH server in Windows, firstly because there are several Windows SSH implementations, both free and commercial, and I cannot know beforehand which one you will decide to use. I would recommend using OpenSSH because it’s the most popular free SSH implementation, but setting it up may be a bit complicated if you have never dealt with it before. Secondly, as far as I know the most popular SSH distributions are documented back and forth (OpenSSH definitely is!), so nothing I could write would add significantly to already existing documents. However, the client side setup is within the scope of this article so I will elaborate on that.
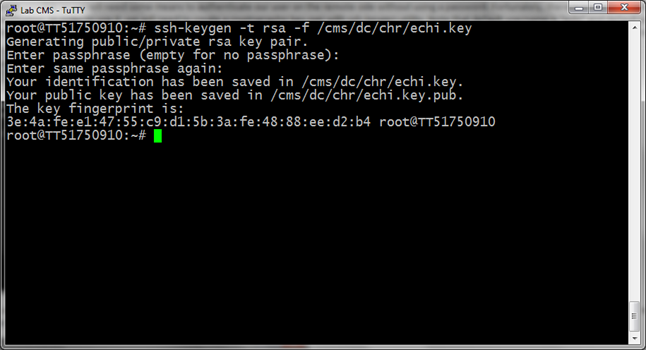
In order to copy our files to database server, we will need a username and a set of keys, these are used to authenticate the user instead of a password. With SSH, you can still use password authentication if you want to, but due to security restrictions, no SSH utility will accept a password entered with automated means (unlike FTP or Telnet), only a live typing will do. All this is great for security but we want our application to run as unattended as possible so we will need some means to authenticate our user on the remote side without using a password. Fortunately, there is a way to do that, and it doesn’t break security, too. It is called symmetric key authentication. In order to use it, we will need to create a cryptographic key pair with ssh-keygen utility. Note that default username is “echi” and default path to private key file is /cms/dc/chr/echi.key. You can change it for whatever username or path you want, or just leave it as is so it will just work.
Run ssh-keygen and when it asks you for a passphrase, just press Enter twice:
Now that we have our set of keys, we need to let the other side know that we’re going to use them. Private key is just that, it’s private and nobody should have access to it; but we will need to let the other side know our public key. Print its contents on the terminal:
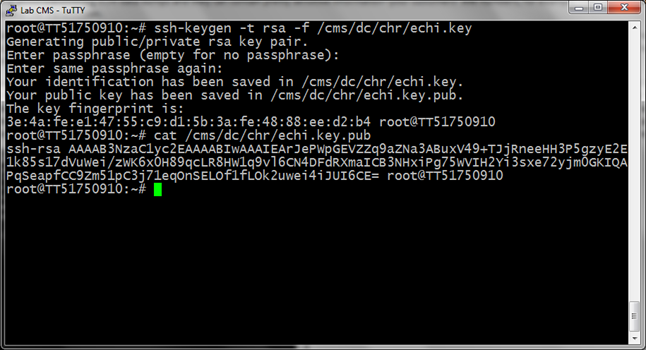
See that long string of characters after the “cat” command? That’s our public key all right. You can just copy the text and paste it in Notepad on the database server using Remote Terminal session. If you are using OpenSSH, you should store public keys in a file called authorized_keys that should be placed in .ssh directory in echi’s home directory, %HOME%/.ssh/authorized_keys. Note that there is no extension. If you are not using OpenSSH, consult your SSH server documentation as to public key file placement.
When you have configured public key, it’s time to test SSH connectivity by trying to login on the remote host:
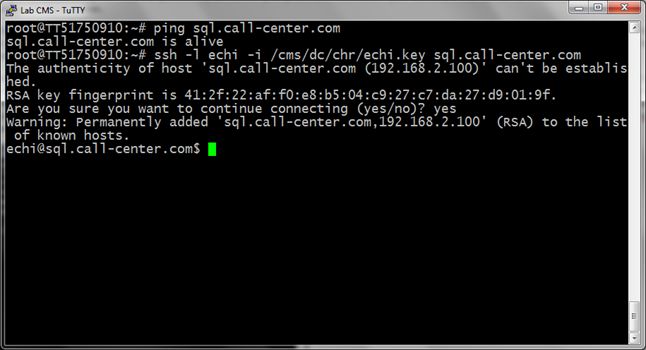
Note that SSH tells you that it does not know the host you’re trying to connect to and asks for your confirmation–you’ll need to type in “yes” and confirm with Enter. This procedure is one of the key security components of the SSH suite, because a fingerprint is unique for every host and if remembered one does not match live one you get from the host upon trying to connect, SSH will cry out loud and won’t allow you to connect:

Note that I changed the host key for illustrational purposes; it’s highly unlikely that you would ever encounter a hacking attempt, especially within your organization’s local network. If you would ever see a message like this, it would probably mean that your IT department has changed the hardware or the software on the database server, but nevertheless it’ll never hurt to check. And it’s nice to know that your connection is secure.
Now it’s time for the final check, i.e. if SCP connection is working. Let’s create some test file and copy it over to the database server:

Note that SCP command is rather long so I’ll repeat it here: “scp -i /cms/dc/chr/echi.key test .txt echi@sql.call-center.com:/tmp”. As you can see, the file was successfully copied to our host sql.call-center.com in the /tmp directory, and that means our connection is working properly.
Next thing you need to do is to install ECHI subsystem. Read this document and follow the instructions in it to enable ECH software on your CMS system, “Setting up the ECHI package” section has step by step explanations. Follow them and choose default program paths for uucp_copy and uucp_check; for the computer where to send files, enter actual DNS name of the database server, or IP address if you choose not to use DNS. Default ECHI state is better “off” but that would require someone to start it every time CMS is restarted. The buffer size is arbitrary, consider your call traffic and decide how often you would like to receive information–one record in buffer contains one call segment, and when the buffer gets full, it is dropped to disk and transmitted. However, setting buffer size too low could mean that files will be dumped faster than they could be processed and transmitted and that is undesirable situation. I always set buffer size for its maximum value, it yields binary data files about 1 megabyte in size which is pretty hefty but is useful for call centers with significant call traffic–and when traffic is low, buffer gets dumped and transmitted at least once per interval anyway which is fine for my purposes. Your Mileage May Vary, though.
Note that ECHI installation process would require restarting CMS service and is better done off hours. When you have ECH installed, it should start generating data files in /cms/cmstables directory, with names like “chrXXYY”. These files are encoded in proprietary binary format that cannot be read by humans or other software without specialized convertor that would decode binary format into text files for further processing. Avaya charges a hefty chunk of $$ for such convertor, but there are free alternatives available, one of which is my own ECHI decoder program. In fact, it’s not only one program but rather a suit of programs I developed for one of my customers, and it’s been in use for two years without any major problems.
This ECHI decoder suite has one major advantage compared to other free ECHI processors: it does not require any framework or software that is not already on CMS server. The program itself is written in Perl that comes standard with Solaris operating system that runs on your CMS server, there is no need for additional modules or programs; the only software you will need to install on CMS server is ECHI decoder itself and transmission and maintenance scripts I provide with it. They’re rather small and require zero to very little maintenance, giving you an opportunity to extract call detail data from CMS effectively for free. This is basic version of ECHI decoder suite, however. I don’t mind sharing some of my know-how with fellow Avaya engineers but to share all of it for free would be a little too altruistic. J The extended ECHI decoder suite supports double text-and-binary sequenced transmission, FTP protocol as well (as robust as it can get), automatic error recovery and retransmission, backup data storage with automatic cleanup, watchdog service with email and SNMP notification–in short, it’s a solution suited for large installations where robustness and minimal maintenance footprint are at premium. If you’re interested, just drop me an email and we’ll discuss it further.
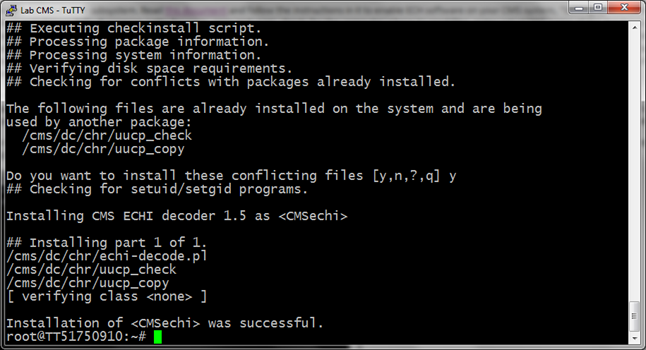
Installation process for ECHI decoder is pretty straightforward, and for simplicity I will assume that your CMS server has Internet access. Type in this command: “pkgadd -d http://avaya.dwalin.ru/wp-content/uploads/2010/08/CMSechi-basic-1.5.pkg”
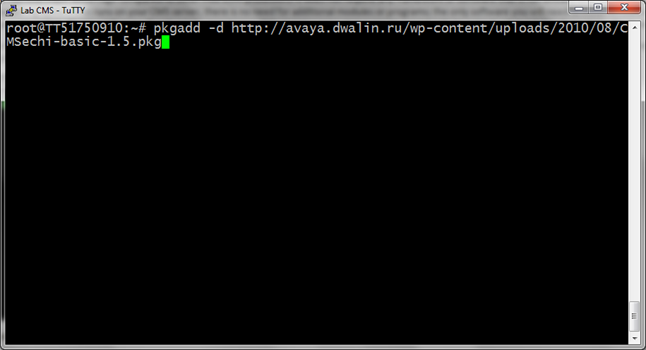
Press Enter and you will see the following prompt:
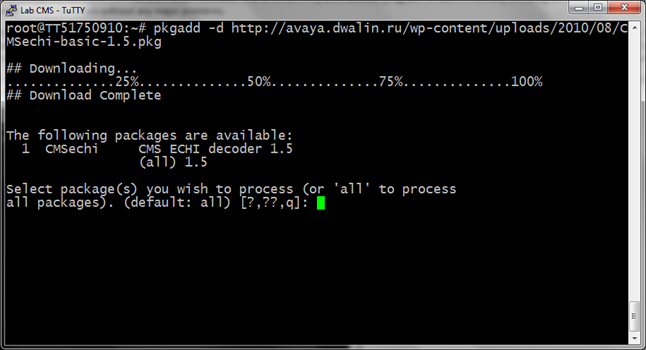
Just press Enter to install all packages–there is only one in that package anyway. You will see the following prompt:
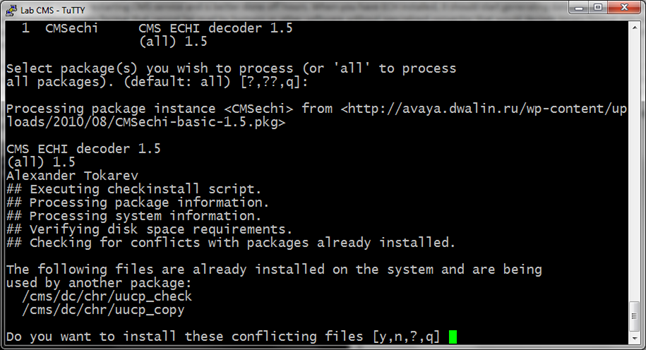
Type in “y” and press Enter. These two files come with CMS by default and my package needs to overwrite them for all-default installation. You should see no more prompts and installer will just finish with OK.
If your CMS server does not have access to Internet or there is any kind of problem downloading the package, you can download it on your computer and then upload on CMS server. I won’t describe how to do that, because this post is getting quite long already. J
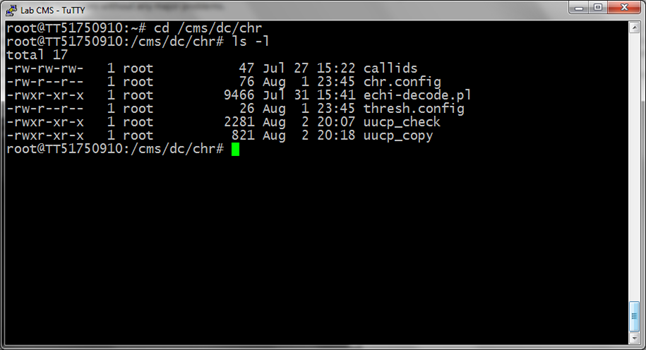
Now, change directory to /cms/dc/chr and check that all files are there:
Hooray, we have installed the ECHI decoder. The one last step is to check how it’s working. If ECHI subsystem in CMS is installed but not “turned on”, it should generate chrXXYY files I was talking about up there in the beginning. Check if some such files are already there:

Whoa, here it is. The files are being created but not transmitted since ECHI is turned off. We don’t want no screw-ups so we’d better check how it’s going manually:
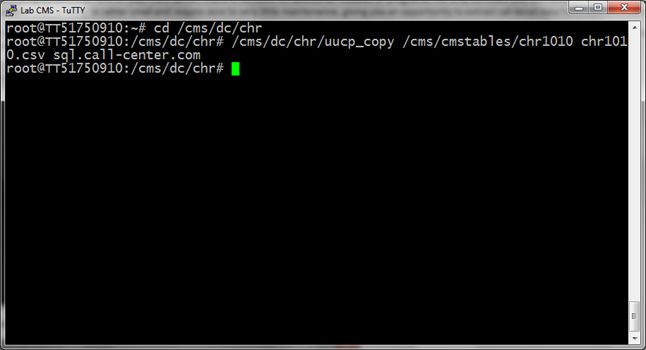
You see that uucp_copy gave no output? It’s not supposed to, because it is called by CMS service that doesn’t care for any human-readable output anyway. Let’s check our log files, firstly see if they’re here:
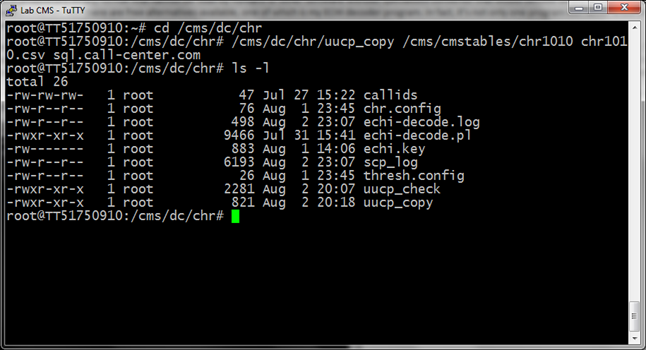
Looks normal, since basic ECHI decoder scripts are generating only two log files: echi-decode.log for conversion and scp_log for transmission. Let’s check the conversion log:
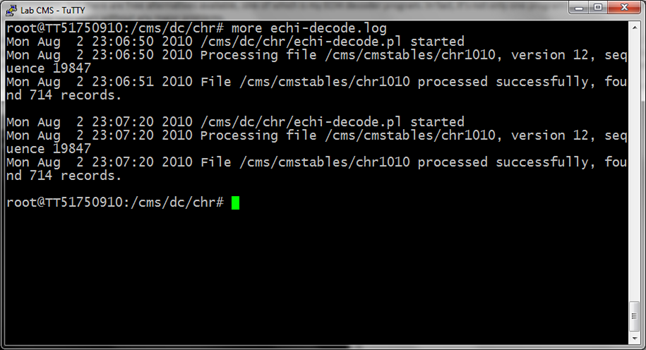
Well, no errors mean everything’s all right. Just like needed. Now let’s check transmission log:
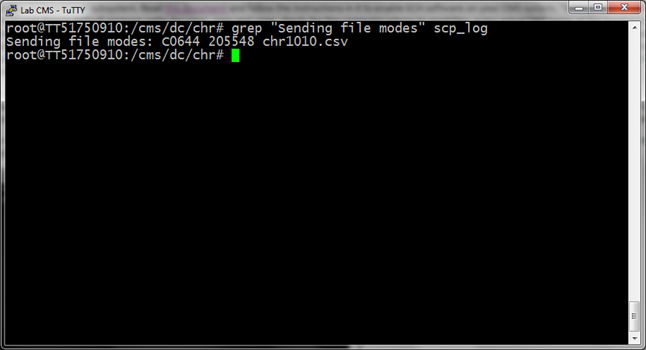
The line we looked for tells that transmission was successful. But one more check won’t hurt anyone, right? Let’s login on the remote machine and see if the file is there:
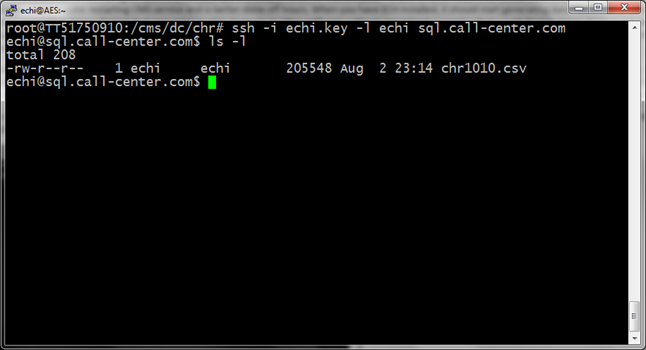
Right-o! The only thing that’s left is to turn ECHI subsystem on with cmsadm option 6, and enjoy your all-fresh ECHI data. J
CMS, data export, echi
Good Article…Keep up the good work
thanks for your response on the forum! Your article is excellent – way above me but excellent!
This article helped me tremendiously. I’m currently building an SSIS/C# solution for call-level detail ETL. The echi_decode script is simply GOLDEN if I may so. Truly great work my friend, It’s so refreshing to see smart folks in the telecom biz making life easy for us noobs :) Hit me up with a donate link or if you’d like to chat over a beer, I may just have to fly to Russia or NYC!
Cory,
Thanks, it’s nice to know your work is appreciated. :)
Regards,
Alex.
Can you tell me the commands to edit the ech_filter.conf file? I need to add a new VDN to it and don’t know the UNIX commands to edit this. Thanks in advance.
Great tutorial!! and tools Thanks.
How can i get advance decoder suite?
Great article, I completely agree with you when you say that so many people don’t even know that these reports even exist. Your article is a BIG HELP. Keep up the good work.
Hi Alex,
if there are more parts to follow, please don’t forget to mention, that special considerations must be taken during CMS update, as customized uucp* files will be overwritten.
igoriando,
Well it kinda goes without saying that any extra software on CMS server won’t survive upgrade process without special measures. But you’re right, I should probably mention that in my article. Thanks for suggestion.
P.S. Not sure if there will be second part; I’m not working in this industry anymore so I can’t really pick a real use-case and make it into generalized tutorial. If you have ideas on this part, you’re welcome to share.
Regards,
Alex.
Hi Dwalin,
I will be doing this on a R16.2 system with MS SQL (not sure what version yet).
Your first part helped me already – I will be glad to write part 2 for you :-)
Will let you know.
i need help too
Hi Dwalin
Your artical is of great help Works perfectly on R13. Need help for R16.2
thanks in advance
i need help to i have 16.1
?
Hi,
I want to change the host I tranfer the ECHI files. Can you help me? I found the scripts, but I can found the user, password of the ftp and the destination_machine…
Thanks in advance.
Hi Jose,
It’s not that convenient to discuss it here; drop me a line at dwalin [at] dwalin [dot] ru and I’ll try to help you.
Regards,
Alex.
Hi,
I want to add that I’am going to change to extended file format the echi files. Actually, the format is standard.
Thanks.
Hello Alex,
GREAT job on this. I’m having a heck of time getting any SSH server on windows to accept SCP transfer but have no issues with SFTP or connecting via SSH.. Would this package work with SFTP or does it rely on the SCP command/protocol?
Also do you know if Solaris or CMS has a feature to block you out after a while ? I installed the ECHI package with “CMS Off but IDS running” and when I got to the point to install your decoder “CMSechi-basic-1.5.pkg”, it failed saying IDS needs to be running, now it won’t let me back in the server using user CMS or Root, giving me login failed, and I’m 100% sure the psw is correct. I’ve even tried it from a different machine/IP.
Thanks again.
Bob
Hi Bob,
Re: SCP woes; that sound strange. Basically, SCP and SFTP are two “subsystems” within SSH protocol; if one of them is working the other should, too. It’s not like they’re using different TCP ports or something, most probably that’s a configuration issue on the server side. ECHI software itself doesn’t care which way the files are transferred, so you can modify the scripts to use SFTP. It’s just SCP is easier to work with, is all.
As for user blockage, this sounds even more strange. The message you’ve seen about “IDS needs to be running” is weird; the CMSechi package doesn’t touch IDS even remotely. In fact, it only copies a bunch of files in /cms/dc/chr; it doesn’t have any pre- or postinstall scripts in it. I would guess that the messages regarding IDS were from Avaya ECHI package, and that probably something went awry when you installed it.
The blockage itself can be caused by Solaris being in single user mode; whenever I need to do something that requires single user mode I remind myself to be very, very careful about it. If you log off in single user mode, you can’t connect back remotely. You can either log in on the console (including serial console), or reboot the machine so that it comes up to multiuser mode again.
Hope it helps!
Regards,
Alex.
Thank Alex. Yes the SCP situation is a bit weird. I even tried accessing the server via WinSCP set to SCP and it authenticates and just hangs at “starting the session” but SFTP goes right through.
I’m pretty sure the login failure has nothing to to do with your package and thanks fior for the single user mode hint. I’m going to have someone reboot the box tomorrow.
Can you tell me which script needs to be modified to switch SCP to SFTP ?
Thanks Again and keep up the great work. We need more smart people like you.
Bob,
If you can take a look at sshd logs on the server side, that would probably help. Sometimes sshd bucks at non-obvious things, for example it won’t allow you to use key authentication if your ~.ssh/authorized_keys is writeable by anybody else. It does complain in logs though.
You need to modify uucp_copy script to use sftp instead of scp. Not sure if sftp is easy to do automated transfers with, honestly I’ve never actually used it. I barely ever need interactive transfers, so I mostly use scp.
As for keeping it up, well… I’m not working in telecom industry anymore, so there’s little chance I will continue improving this particular solution. I have something new and exciting coming up though, watch for announcements in the next month or two. :)
Regards,
Alex.
Great job Alex, I have some stupid questions.
1. If you buy the Binary to ASCII converter package from Avaya then can you or do you still need to use this ?
2.So with Avaya’s Binary to Ascii pkg the files placed in /cms/cmstables will be text deliminated ascii instead of Binary? and does their package provide a scp, sftp script or somthing like that to push the files to the DB server ?
Thanks
Hi Brad,
1. If you buy Avaya’s package, you can use either my converter or Avaya’s. It’s possible to use both of them but I guess there’s no point in doing that. Frankly I’ve never even seen that package, I never had a customer willing to shell out $10+k for something I could provide them for free.
2. No, the algorithm is the same as with my convertor. Files in /cms/cmstables will remain binary because that’s the way CMS works, but you will get a script that will convert them to ASCII delimited text and ftp them up to database server. I don’t know if Avaya’s script supports scp or sftp. It probably can be modified to do so.
Regards,
Alex.
Hi Alex,
Quick question for you. So does the content of /cms/cmstables/, all the binary chr files are suppose to get purged at anytime after the ascii csv files successfully gets created ?
Thanks
Bob
Hi Bob,
No, binary chr files are not deleted by ECHI converter. They’re overwritten by CMS whenever it feels like it, so you can’t depend on old chr files being available for later conversion. If you want to keep a history of chr files on CMS, you’d need to take care of it yourself. I can tell you that it’s very, very useful to keep old chr files. File transmission slips once in a while, or some other glitches happen, and usually in such cases I just dug up the archived chr, ran it through conversion manually and pushed to database server. Customers were happy. :)
Regards,
Alex.
Thanks so much for the info Alex, so no need to worry about the folder filling up with chr files endlessly.
Do you recommend deleting the chr files after archiving them or do they need to stay there ?
Also how does the script know that a chr file has already been processed so it doesn’t do it again ?
Your package works great in a test enviornment so far, but I’m modifying it a bit to use SFTP instead of SCP. If I get some funding this year I’d like to purchase your extended version
Thanks Again
Bob,
No, you don’t need to worry about chr files. Converter script doesn’t know which files were processed, it gets called by CMS for each new chr file. When CMS dumps call records into /cms/cmstables/chrXXXX it also runs /cms/dc/chr/uucp_copy script passing new chr file name and some other parameters. uucp_copy converts binary file to CSV and transmits it, removing CSV file after transmission. There’s also maintenance script uucp_check that CMS runs once in a while; this one cleans up excess logs, etc. So, no littering and no worries. :)
As for extended version, sure. Drop me a line if you want to discuss it more: dwalin [ at ] dwalin [ dot ] ru.
Hello Alex,
First of all, i would like to thanks you for such a wonderful and user friendly documents and its a VERY BIG help for ppl who wants to sit up ECHI, it has really helped me so much. I would like to install the package on my CMS, so that i can have some sample report, which i would share with management, so that i get funding for advance verison. Management wants to see a sample ECHI report before they invest in this. i would be doing it very soon and will let you know if i have any question.
Once again THANKS for knowledge sharing.
Rgds
GPS
Hi,
we use call_record table for reporting, because only this table contains data about VDN and Agent ID at the same moment.
Skills data is not enough for us.
Recently for the first time we met a limitation of 400 calls per 20 minutes. Thus part of the data was lost and it’s lost from time to time where there is a peak of calls.
Could you suggest any alternative solution ?
Hi Ivan,
The solution is described in this exact article. What you’re using right now (call_record table) is a feature called Internal Call History. If you switch to External Call History, you’ll get a similar, albeit slightly extended, set of data but without 400/20 limitation. It is even possible to continue using ICH *and* add ECH as backup of sorts, but collating the data to find missing pieces is a highly non-trivial task so it’s easier to switch to ECH altogether.
Regards,
Alex.
Could you tell me if ECH should be licensed saparately or it’s usually included into the CMS package ?
I’ve been out of loop with regards to Avaya licensing for quite a while, so you better check that ECHI is enabled on your CMS server(s); I’ve described how to do that in the article above. Should be there for all I know, it became the standard option with CMS R13 back in 2005.
Regards,
Alex.
Thanks, looks like it’s included.
But is the following – true ?
CMS can only support Internal Call History or External Call History at one time. The two
packages can not be used simultaneously. Once the External Call History Interface feature is
installed, call data will no longer be inserted into the call_rec table and you will not be able to
access the CMS Call Record report. NICE Analyzer is an optional package that allows you to
view external call history data.
Is there any option to enable both at the same time for a transition period, because all our reporting is linked with ICH call_rec.
Hmm. I wasn’t aware of such limitation, but it’s probably true if it says so. I’d suggest talking to your Avaya rep about this; ultimately it’s up to them to decide if they will support such a configuration on your particular system.
On the other hand, I don’t see why you would want to leave ICH on for the long term; if a system is unreliable it’s less than worthless, it’s misleading. In my opinion you need to switch to ECH, put processed data into separate database and then point your reporting tools to that database instead. The table structure will be almost identical, so that change should be easy enough.
Regards,
Alex.
Can the current avaya pserv/ ech files be changed to just use SSH and change target server IP in /etc/hosts? Or are there scripts within pserv/ that will also have to be modified.
Hi Corey,
You can probably change pserv script to use SSH instead of FTP, but to my best knowledge, that change won’t be supported by Avaya PSO. If you have current support subscription I’d suggest talking to PSO guys before doing any changes.
Regards,
Alex.
Hi
i need pull data from echi into sql server. can you please tell me will your decoder help me with it?
Thanks in advance
Sudhanshu,
Yes, my decoder can help you with that.
Regards,
Alex.
Thanks for the reply.
How can i acquire it Alex?
You can download it here: http://avaya.dwalin.ru/wp-content/uploads/2010/08/CMSechi-basic-1.5.pkg
The installation instructions are in the article.
Regards,
Alex.
Thanks alex…
Will definetely try it out and let you know the results
Regards
Hi Dwalin,
I’m totally new to CMS….. Please correct me if I m wrong…
The article above seems to be for DOS based CMS Avaya… However, we are using Windows based CMS Supervisor R16…… Our company is currently planning to buy the ECHI connector…
Can you please help me with more article on ECHI…. or direct me to websites where I can get more info on this…????
Thanks in advance…
Regards,
Pawan
Hi Pawan,
Avaya CMS was never DOS based, it is UNIX (Solaris) based instead. Windows based CMS Supervisor is the *client* for the Avaya CMS *server*; client and server can be of different versions but not that much different. I seem to recall that CMS Supervisor R16 supports CMS R14 and newer so that’s what you have.
ECHI extraction is done on the server, client has nothing to do with this; the article applies to all server versions starting at least with R9. There’s plenty of documentation if you Google for it: https://downloads.avaya.com/elmodocs2/cms/R14/ECHI.pdf
Regards,
Alex.
Thanks Alex for the info…. much appreciated…
Regards,
Pawan
Hi Alex,
I am trying to extract this decoder ; It is giving me error stating that cannot open file. c:\user\CJ\downloa\CMSSechi-basic-1.5.pkg’ as archive
http://avaya.dwalin.ru/wp-content/uploads/2010/08/CMSechi-basic-1.5.pkg
In CMS where do I have to config sftp IP address to push the data into server
Thanks
CJ
CJ,
This file is Solaris package to be installed with standard Solaris tools, I doubt that you can unpack it in Windows. If you want to install it on the CMS server, just follow the instructions in the article above and it should work. The IP address of the destination server is configured when you set up the ECHI option in the CMS using cmssvc, please refer to an appropriate documentation for your CMS version.
If you want to review the code before installing the package, you can do that in the Github repository: https://github.com/nohuhu/echi-decode
Regards,
Alex.
Hi there,
I’m testing the ECHI decoder on our backup CMS R16 server, it works but after a few hours it crash. I can’t find anything in the logging. Maybe someone can help me?
I use vandyke vshell for the ssh server on windows 2008. I installed everything like this tutorial. When i start the ECHI service it copies everything of the buffer to the ssh server. After every 15 minutes i get a csv file on the ssh server (our CMS setting is 15 min).
After a few hours the process doesn’t work anymore. I see the following in the logging
chr_log
Wed Apr 9 16:05:32 MEST 2014 Successful exit
Wed Apr 9 16:05:32 MEST 2014 No error files for group: 12
Wed Apr 9 16:05:32 MEST 2014 Successful exit
Wed Apr 9 16:05:33 MEST 2014 No error files for group: 05
Wed Apr 9 16:05:34 MEST 2014 No error files for group: 05
Wed Apr 9 16:05:36 MEST 2014 No error files for group: 05
scp_log
Sending file modes: C0666 37693 chr1404.csv
debug1: channel 0: read drain
debug1: channel 0: ibuf empty
debug1: channel 0: send eof
debug1: channel 0: input drain -> closed
debug1: client_input_channel_req: channel 0 rtype exit-status reply 0
debug1: channel 0: rcvd close
debug1: channel 0: output open -> drain
debug1: channel 0: obuf empty
debug1: channel 0: close_write
debug1: channel 0: output drain -> closed
debug1: channel 0: almost dead
debug1: channel 0: gc: notify user
debug1: channel 0: gc: user detached
debug1: channel 0: send close
debug1: channel 0: is dead
debug1: channel 0: garbage collecting
debug1: channel_free: channel 0: client-session, nchannels 1
debug1: fd 0 clearing O_NONBLOCK
debug1: fd 1 clearing O_NONBLOCK
debug1: fd 2 clearing O_NONBLOCK
debug1: Transferred: stdin 0, stdout 0, stderr 0 bytes in 0.0 seconds
debug1: Bytes per second: stdin 0.0, stdout 0.0, stderr 0.0
debug1: Exit status 0
echi-decode.log
Wed Apr 9 15:44:11 2014 /cms/dc/chr/echi-decode.pl started
Wed Apr 9 15:44:11 2014 Processing file /cms/cmstables/chr1403, version 16, sequence 454
Wed Apr 9 15:44:12 2014 File /cms/cmstables/chr1403 processed successfully, found 318 records.
I see in the echi-decode chr1403 as last file. But in scp logging I see that chr1404 is the last file. The file is also on the SSH server.
What can be wrong?
Thanks
Gido
Hi,
Really nice job. I wonder if somebody has windows based converter.
cheers,
ed
[…] read this post that triggered me to create the AvayaECHI tool. The AvayaECHI tool captures ECHI data from CMS, […]
[…] avaya.dwalin.ru » Using CMS External Call History … – Avaya Call Management System is very good as a standalone reporting solution, but it has its drawbacks, too. Besides having very outdated architecture and performance …… […]
Hello
i found this very usefull article, thanks a lot; we are in CMS15 and we tried to stop the package echi to use ODBC; but we need to the extend fields (ringtime, quetime) must be save in the call_rec table; do you have any idea if its posible to do it ?
Hi Jose,
Honestly I don’t remember if these fields are available in call_rec table in R15; what I do remember is that before R16.3 (maybe R16.2) there was a hard limit on the number of rows per interval stored in call_rec. If my memory does not fail me, it was about 400 calls per interval. For larger call centers that meant call_rec was practically unusable since call traffic was almost always over 400 calls per interval and excess data was simply lost.
I would recommend using ECHI instead of call_rec table for R15, it will provide you with all the data that there is.
Regards,
Alex.
Please let me know what I’m doing wrong. Thanks.
(r3wpcmi)-(root)=# /cms/dc/chr/echi-decode.pl /cms/cmstables/chr5801 /cms/dc/chr/chr.csv <
Fri Mar 27 16:36:09 2015 /cms/dc/chr/echi-decode.pl started
Fri Mar 27 16:36:09 2015 Processing file /cms/cmstables/chr5801, version 163, se
quence 103055
Use of uninitialized value in print at /cms/dc/chr/echi-decode.pl line 160.
Use of uninitialized value in read at /cms/dc/chr/echi-decode.pl line 164.
Fri Mar 27 16:36:09 2015 File /cms/cmstables/chr5801 processed successfully, fou
nd 0 records.
Hi Randall,
First make sure you’re running the last version of the script: https://raw.githubusercontent.com/nohuhu/echi-decode/master/echi-decode.pl
If that doesn’t help, send me a copy of that ECHI file at dwalin [at] dwalin [dot] ru and I’ll try to see what the problem is.
Regards,
Alex.
Hello,
We’ve recently installed CMS R17 and I’m trying to implement this. We are using the virtual appliance that Avaya is offering and it’s using Red Hat Linux instead of Solaris. Is there any chance that this might work on a Red Hat based CMS, specially the .pkg file that is clearly intended for Solaris use.
Hi Georgi,
The decoder script will work in Linux but the package is Solaris specific – and is quite outdated, too!
I’m no longer maintaining the packages because the scripts are available on Github: https://github.com/nohuhu/echi-decode. Grab the latest versions of echi-decode.pl and uucp_copy, save them in /cms/dc/chr and run chmod +x on both to make them executable.
You should be good to go after that.
Regards,
Alex.
Hi Dwalin,
thanks for the perl script, it working perfectly.
ive tested for r13, r15 and r17. its working.
thank you very much.
rgds,
satria
Great Job.
One question: title says part 1. Is there any part 2…?
Hi Dwalin,
Thanks for all the info, I recently started managing an existing setup where our CMS box is currently sending data files via FTP to a windows 2003 box and everything is going well. However because of PCI requirement we have been told we need to start using SFTP to transfer our files. We setup an SFTP service on this same Windows 2003 box and have created public keys and we can connect to it from CMS using SFTP and and send text files to it manually,…however when the scripts run automatically the files are not sent in the “binary” format and so the data in the files gets un-neded characters placed in it and the Avaya handler only imports the first record in the file and fails on the rest. How do I fix the transfer type used to binary so my data file does not get modified during the transfer?
Hi Team,
I want to know that whether CMS ECHI package has predefined fields of data it captures and create the ch** log files or we have define it somewhere if yes then where and how.
Hi Alex,
Your article is excellent!
We are using CMS R16, sending data to Windows 2000 server which is accessed by SQL server to publish the reports, we are trying to send the data to Windows 2008 server(new system) instead of Win 2000 server which is pretty old…please advise what needs to be done on the 2008 server to receive the data ?
regards,
John
Hi Alex,
Your article is excellent!
Need your help to setup PC to receive CMS ech data.
Currently CMS is sending data to Windows 2000server, we are trying to create a secondary link to send the data to windows 2008 server, please advise what needs to be done to receive the data on the secondary system.
regards,
John Bhaskar
Hi Dwalin,
why don’t I have files in /cms/cms tables directory ? in the external call history settings is started.
3.13.2019. Helpful post. Is there an option to extract tracer details for a cms id with trace enabled?
Hi Jason,
Sorry for the late reply. I haven’t worked on Avaya systems for almost 10 years so unfortunately I don’t have an answer for you. :)
Regards,
Alex.
Hi Alex,
Wonderful blog post and research!
Our CMS has NFS mount points set up for getting data on/off the server already today. Example I wrote a script to export CMS tables to flat files and save them to the NFS shares (instead of sftp).
Do you think it is possible for me to rework your latest scripts from github to save the converted ECHI data to a local path on the server? In my case it would be a NFS mount point which effectively gets the data off the CMS server without SFTP. I’m trying to avoid the need for a separate SFTP server since i already have network storage available.
Thanks!
Hi Matt,
Thanks, I’m amazed this blog post can still be useful despite being almost 10 years old. :)
If you already have NFS set up then I agree, there’s no sense in using SCP for file transfer. The only reason why I chose to document SCP setup here is that among all cross-platform ways (Unix to Windows, Unix to Linux, etc) I thought SCP was the easiest to configure for non-IT folks.
To the point, you will need to modify
uucp_copyscript from my GitHub repo to copy the file do NFS destination instead of remote system. There is no need to modifyechi-decode.plfor this.Regards,
Alex.
Hi Alex,
Great article. Is there to modify the destination location mailbox from within the CLI? ECH is installed and authorized, working great, but just need to modify where the files are being sent to. Currently the files go to “rcainfo” but need to go to “rca_billing”.
Thank you for your insight.
It seems your script is working fine.
But, don’t know why, it seems CMS is not creating the chrxxx files at /cms/cmstables .
ECH is turned on, and I have checked all logs, so nothing seems to get error.
Any clue?
Hi Johnny,
If ECHI is licensed and turned on then files should be created… Not sure why it doesn’t work, and unfortunately can’t help you much with diagnosing this issue. I haven’t been working on Avaya stuff for about 10 years now, and my memory of how things are done in that land are getting fuzzy. :)
Regards,
Alex.
Since I have installed the decoder, when I said the chrxxx files are not being created, That’s the error I have been recieving in my CMS logs.
“SRC_ERR_NUM=-00001 PROCESS=ch_rec PID=000797 hist_rec.c:00452 SEVERITY=ERROR ACD=01 DUPS=02345 CALL RECORD ERROR: Call records not being stored. Call Services.”
What can I do to get help from this?
Forgot to tell, it is a CMS R14.
Regards,
Johnny.
Johnny,
I think it is time to give Avaya Services a call. This error looks like something internal to CMS is misconfigured, or there is a problem that is deeper than my ability to diagnose.
If you really can’t do that, try restarting ECHI service and/or reconfiguring it from scratch. Not much advice I can offer beyond this, sorry.
Regards,
Alex.
Hi, is this script available for RHEL versions? or we have to use Avaya’s ECH Handler
Kaleem,
I don’t have access to a CMS system anymore and can’t verify if the script works with RHEL. It should work if you try it, I just can’t guarantee that it does.
Regards,
Alex.
One of my customers is having an issue with your decoder, it seems that your decoder is always sending 0 on the agt_released field, i already decoded the chr file with a CMS utility like crecpr and the agt_released comes with 1 and 0 but when customer is using your decoder the agt_release is always 0 on the csv files. Any way to solve it?
Hello, this article has been beneficial to us for some time now. However, when we have added our 2nd ACD, then activate the chr report. The current working CHR report in ACD becomes problematic. It stops generating CHR reports. The only workout we found is to restart external call history and cms services. Then, it will be ok for 8-9 hrs, which is not an optimal practice to restart these processes every now and then. May we know if how we can resolve this issue? Hoping to get your contact details, especially your email, so we can get in touch with you. Thank you!